DIY Bluetooth Headphones
The Problem
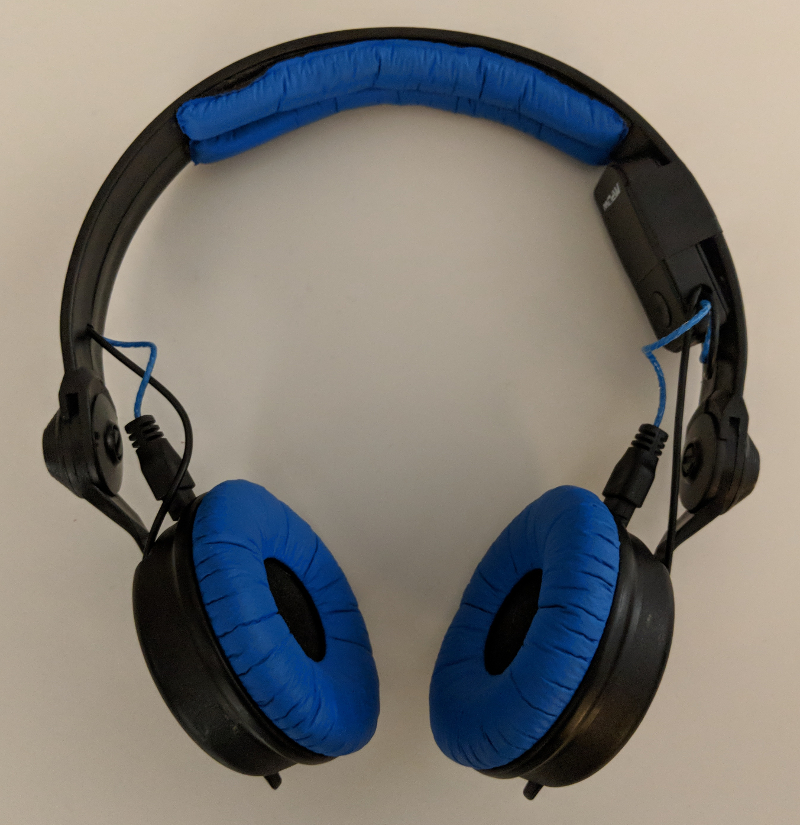
I’ve owned my pair of Sennheiser HD-25 MKII headphones for over 5 years at the time of writing. In that time, they’ve become my absolute reference for what music should sound like. Listening on anything else, even something higher quality or ten times the price, just doesn’t sound right.
This caused a bit of a problem when I finally ditched my iPhone for a Google Pixel 2, as Google decided (to much derision) to ditch the 3.5mm headphone jack! I wasn’t willing to part with my favourite pair of headphones, and the USB-C -> 3.5mm adapter that comes with the Pixel 2 is pretty flaky in terms of reliability and ruggedness.
I needed some way of using my HD-25s with the Pixel 2, without totally wrecking the headphones.
The Solution
It seemed like the obvious solution would be to somehow turn the wired headphones into Bluetooth ones! This has a couple of issues though. Firstly, the HD-25s aren’t exactly cheap, so ideally any conversion would need to be completely reversible, meaning no holes in the earcups etc. Secondly, Bluetooth headphones aren’t the simplest of things to build, so bootstrapping a pair myself would probably be off the table as it would be too time consuming and expensive.
Part of the beauty of the design of the HD-25s (and the reason they’re favoured by technicians and DJs worldwide) is that all the parts are user-replaceable. This is a rare blessing in the world of cosumer electronics these days, and makes them perfectly hackable for a project like this.
Of course, Sennheiser’s intent in designing them this way was always that you’d replace anything that breaks with their OEM parts, and they’d charge you through the nose for them. Unfortunately for Sennheiser, AliExpress sellers have other ideas. So now I’d discovered that replacement parts can be bought fairly cheaply, I could start thinking about Bluetooth. I wanted a premade, LiPo battery powered Bluetooth module that was small enough to fit in the regular footprint of the headphones (no big boxes hanging off the side), cheap enough that I wouldn’t have to worry about hacking it, and high quality enough that it wouldn’t ruin the sound quality of the heaphones.
This led me to the Mpow Streambot Mini. At <£10, it wouldn’t break the bank much if I broke it, and it supports A2DP so I figured the quality would be acceptable. I ordered this, and one of the cables linked above, and began the long wait for the slow boat from China to arrive.
The Build
When everything arrived, I plugged everything together and tried it out. The Streambot Mini had a surprisingly small design, and the sound quality was pretty much on par with listening via the USB-C adapter. The design of the cable was a little weird, as it didn’t match the design of the original HD-25 cable. I’m not sure how you’re supposed to use it, but it’s definitely not a drop-in replacement. This wasn’t too important here though as I was going to chop it up anyway.
Next, I cracked open the Streambot Mini to see what was going on inside. It’s based around the Microchip IS2020 Stereo Audio Chip. This is nice to see, as opposed to some random unidentified silicon. A glance at the datasheet reveals that this one chip handles pretty much everything, including the Bluetooth stack, Class D audio amplifier, battery charging and power regulation. Pretty cool! I didn’t have much reason to do any low-level hacking of the device, but I did note that underneath the battery there were a lot of handy-looking test pads provided, so I imagine the UART is on these somewhere.
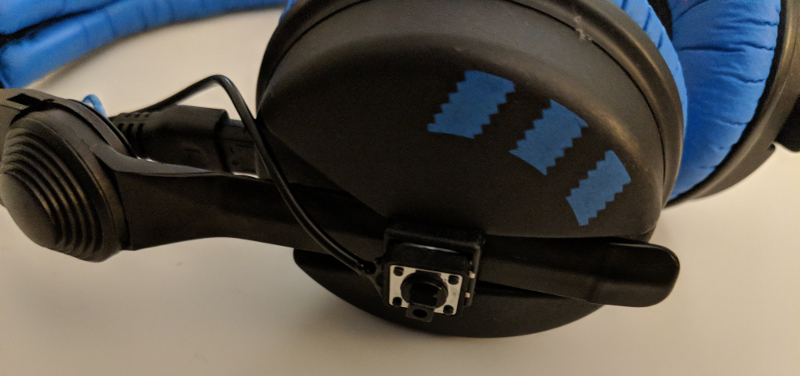
I knew I wanted to break out the audio output from the 3.5mm jack so I traced the pinout, made a note of it and desoldered it. I then cut up the headphone cable and soldered the earcup plugs onto the audio output. I decided at this point it would be cool to have play/pause and skip controls, so I stripped some old enameled headphone wire and carefully soldered it to the corresponding button connections. Once I tested everything, I doused it in epoxy for strain relief and closed the case back up. All the wires exit through the hole that the 3.5mm jack used to occupy.
On the back of the HD-25 ear cups, there are small squares of plastic, one of which provides strain relief for the headphone cable and the other which is purely aesthetic. I took these off my headphones, revealing a shallow space underneath of approx. 12mm x 13mm. A rummage through my parts box revealed some 12mm square tactile buttons that fit in this hole nicely, so they were soldered to the ends of the button wires I’d prepared earlier and glued in place.
Once everything was soldered up, the last thing to do was mount the Streambot Mini. Testing various positions earlier on (when the cables were longer) led to me deciding to put the Streambot inside the heaphone band, as it doesn’t make contact with my head and is comfortable, without looking weird. Currently I’ve mounted this with some black PVC tape, which isn’t great, but I don’t mind too much. At some point I might replace it with adhesive velcro, but for now I’m not putting velcro where my hair is. The final result is that I can use my favourite headphones with my phone wirelessly! The music quality is great and the battery life so far is around 10 hours of play time.
That’s pretty much it! Apologies for the lack of in-progress photos, the whole thing came together in an afternoon and I forgot to document it as I went.
Note: You can actually buy this as a commercial product!. These have come down in price since I did this to the point where DIY’ing only saves you about £10. I haven’t tried them out and can’t vouch for their quality at all, but they look quite good and allegedly support Bluetooth 4.2. If you buy one and use it, drop me an email to let me know how it is!